Sealant Removal vs Cap-Bead Repair: When to Use Each on BC Buildings
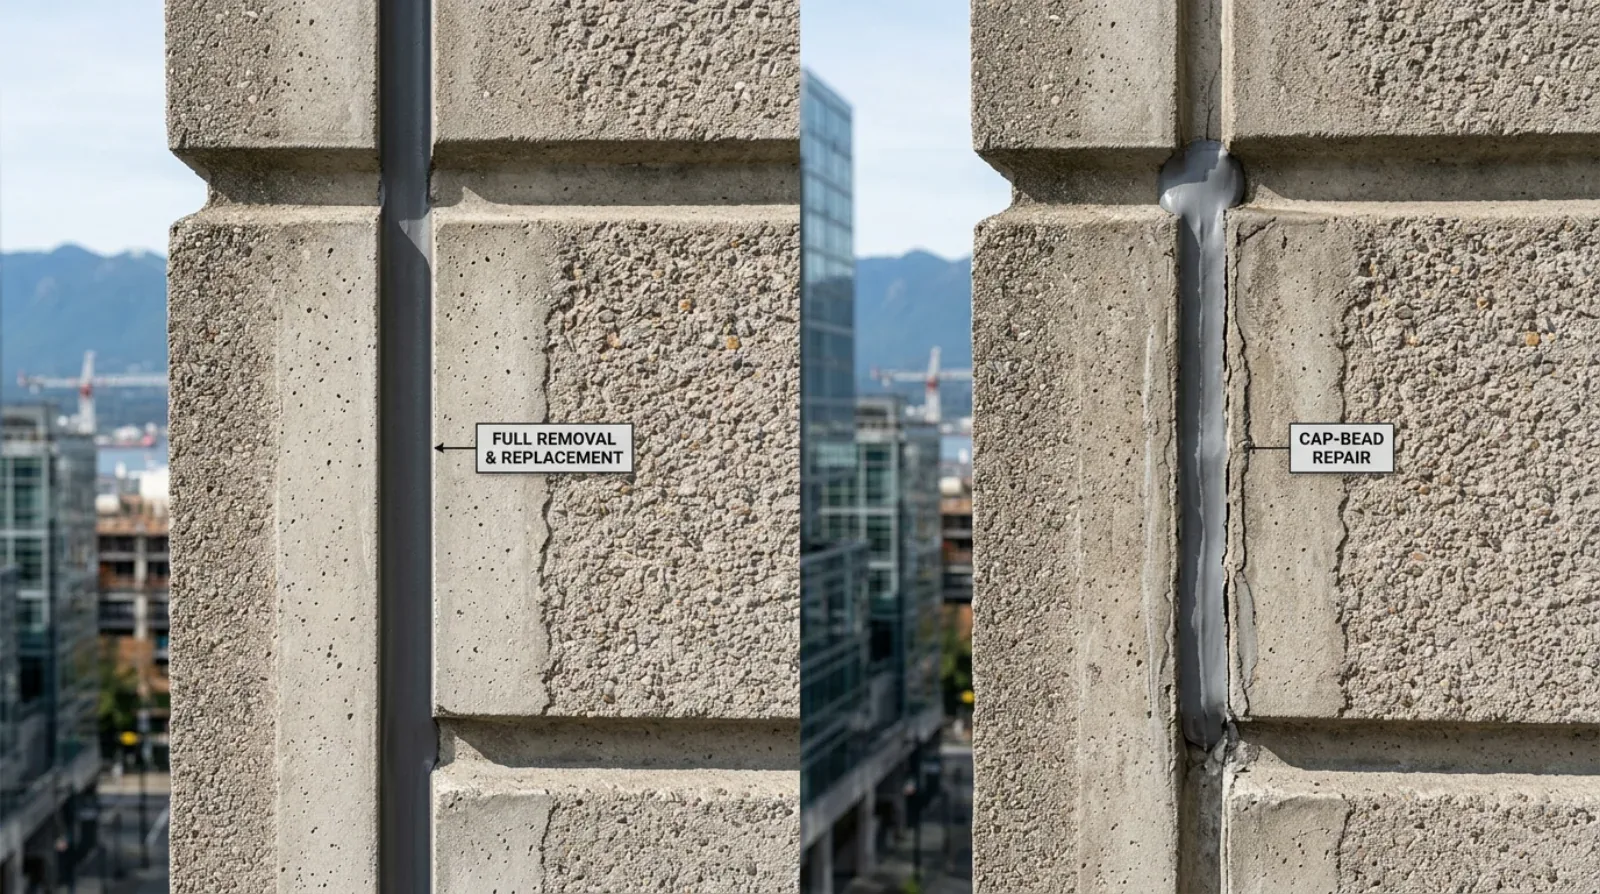
The conversation between a property manager and a sealant contractor often comes down to one question: do we have to remove the old sealant, or can we just apply a new bead over the top? The answer determines whether the work takes one day or three, changes the total cost significantly, and changes whether the repair lasts five years or fifteen.
Both approaches are legitimate sealant restoration techniques. Both are widely used across Metro Vancouver. And the wrong choice on a specific joint can turn cost-savings into a re-do in two years. This article explains how to make the right call.
What each approach actually involves
Full sealant removal and replacement
The standard, manufacturer-recommended approach for restoring sealant joints to design performance:
- Cut out existing sealant with a knife or oscillating tool, removing all of the old material from both substrate faces
- Clean and prime the substrate per manufacturer specification, removing dust, loose material, contaminants, and applying a primer if the substrate requires one
- Install backer rod to control sealant depth and create the correct hourglass profile
- Apply new sealant in a continuous bead, tooled to fully wet both substrate faces
- Smooth and finish the surface for appearance and water-shedding
Total labour per linear metre varies with substrate type, joint geometry, access conditions, and sealant material — but typically 8–15 minutes per metre for an experienced applicator working on accessible joints, scaling up significantly for high-rise rope-access work or complex substrate conditions.
Cap-bead repair
A maintenance technique that places new sealant over existing without removal:
- Clean the surface of the existing sealant to remove loose material, contaminants, and any obvious failed sections
- Verify substrate bond of the existing sealant at the joint edges — any obviously debonded sealant is removed locally
- Apply new sealant as a thin bead across the existing sealant surface, bonded to whatever substrate is exposed at the joint edges and to the existing sealant surface
- Tool and finish the new bead
Total labour per linear metre is typically 50–70% of full removal — meaningful cost savings on any sizeable project.
Why cap-bead repair is appealing — and risky
The appeal is obvious: lower cost, faster completion, less mess, less disruption to building occupants. For property managers under budget pressure, cap-bead is the option that fits the available funds.
The risk is also obvious once you think about it: the new bead is only as good as what it bonds to. If the existing sealant has hidden debonding at the substrate, the new cap-bead inherits that problem. When the substrate bond fails — and it will, eventually, on any joint where the existing sealant has marginal adhesion — the entire cap-bead repair lifts off, taking the new sealant with it.
The other risk: cap-bead doesn’t fix joint movement problems. If the original sealant failed because the joint moves more than its movement capability, the new cap-bead will fail the same way, often faster because it’s a thinner profile.
Cap-bead repairs that fail typically do so within 12–24 months — well inside any reasonable warranty period — leaving the building with the same problem and a sunk cost.
When cap-bead actually makes sense
Cap-bead is a legitimate maintenance technique, not a universal failure. It works on:
- Joints where the existing sealant is fully adhered but showing surface UV degradation, surface cracking, or chalking — and where the substrate bond is intact based on close-up inspection
- Low-movement joints where the original sealant capability was never the limiting factor (typical sealant joints around fixed elements with minimal thermal cycling)
- Sacrificial outer beads on multi-bead joint systems where the cap-bead protects the primary inner seal
- Short-term touch-up before a planned full restoration in the medium term
- Joints where access is severely limited and full removal is impractical, with the understanding that a future full restoration is still required
The common thread: cap-bead works when the underlying joint condition is fundamentally sound and the failure is at the sealant surface, not at the substrate bond or in the joint movement capability.
When full removal is mandatory
Cap-bead is the wrong call — and full removal is the only correct approach — on:
- High-movement joints (expansion joints, seismic gaps, building movement joints) where sealant movement capability must be fully restored
- Material substitution (changing from silicone to polyurethane, or vice versa) where the two materials cannot bond to each other
- Joints with visible substrate debonding at any point along the joint length — the bond failure means cap-bead will not hold
- Wet substrate or water-saturated joints where moisture must be eliminated before new sealant is applied
- Sealant contamination from previous failed repairs where multiple cap-beads have created an inconsistent bonding surface
- Joints exposed to chemical attack, frequent wet/dry cycling, or other aggressive conditions that demand full design-performance restoration
- Joints that have been in service beyond the manufacturer’s stated lifespan (typically 10-15 years for polyurethane in BC conditions) where the entire bead has reached end of service life
For high-movement expansion joints and panel-to-panel joints on cladding systems, silicone vs polyurethane sealant comparison covers material selection in more detail.
Joint-by-joint specification — the right approach for BC tenders
The single biggest specification error in Metro Vancouver sealant tenders is treating all sealant work as homogeneous scope at one price per linear metre. The reality is that any building has a mix of joint conditions, and the correct technique varies by joint.
A proper specification process:
1. Joint inventory and condition assessment
A qualified contractor or building envelope consultant inventories all sealant joints on the building scope, photographs each joint type, and assigns condition ratings:
- Condition A — minor surface deterioration only, substrate bond intact, cap-bead viable
- Condition B — sealant deteriorated through depth, substrate bond questionable, full removal required
- Condition C — visible debonding, joint movement beyond capability, structural concerns — full removal plus substrate or joint repair
2. Method specification by joint type
Each joint type in the inventory is specified for a particular treatment:
- Cap-bead candidates (Condition A joints) — material, thickness, surface prep
- Full removal scope (Condition B and C joints) — removal method, substrate prep, primer requirements, backer rod, sealant material, joint configuration
3. Material specification
Sealant material is specified per joint type based on:
- Joint movement capability required
- Substrate compatibility
- Service life expectation
- Exposure conditions
- Manufacturer’s data sheets and warranty terms
4. Tender structure
The tender prices each scope separately:
- $/metre for cap-bead work
- $/metre for full removal and replacement (typically with sub-categories for different access and substrate conditions)
- Lump-sum or unit pricing for any required substrate repair, primer application, or special detailing
5. Warranty terms
The contractor’s warranty must reflect the expected service life of each scope:
- Cap-bead work — typically 5-year material and labour warranty
- Full removal and replacement — typically 10-year material and labour warranty with manufacturer endorsement
Common tender failures
Tenders that go wrong typically share characteristics:
- Single price per metre for all sealant work, regardless of joint condition — invites the contractor to do cap-bead universally to maximize margin
- No joint inventory or condition assessment — the contractor and the owner are working from different mental models of what needs to be done
- Warranty terms shorter than 5 years even on full removal-and-replacement work — signals either contractor uncertainty about quality or budget cuts that compromise execution
- No manufacturer involvement — sealant manufacturer technical representatives can provide site-specific recommendations and substrate compatibility verification that strengthens both the spec and the warranty
- Award based on lowest price alone without scope normalization — comparing a bid that includes proper substrate prep against one that doesn’t is comparing different scopes
Cost implications of the right vs. wrong specification
The cost comparison comes down to service life, not unit price. Cap-bead universally applied across a mid-rise strata will appear cheaper at contract award — the labour-intensive removal step is eliminated and the quoted rate per linear metre is lower. But joints that should have been full removals will fail inside the cap-bead’s stated service life, triggering re-tenders for those sections within two to three years.
A joint-differentiated specification costs more upfront on a line-by-line basis. The full-removal scope is more expensive than cap-bead per metre, and applying the right method to each joint type requires a contractor who has done a proper condition survey rather than one quoting a single flat rate. Over a 15-year horizon, however, the differentiated specification avoids the multiple re-tender cycles that cap-bead universally applied will almost certainly produce.
The practical point for a strata council reviewing quotes: if two contractors quote the same building at meaningfully different prices per linear metre, ask each one what percentage of joints they are proposing as cap-bead versus full removal — and what their basis for that determination is. The contractor who did a proper joint-condition walk will have a specific answer. The one who is defaulting to cap-bead everywhere to win the job will not.
When working with a qualified contractor matters
A contractor with proper sealant expertise will:
- Walk the building with you and identify joint condition variations
- Distinguish between cap-bead candidates and removal-required joints
- Specify materials per joint type with manufacturer endorsement
- Provide written warranties that match the scope
- Document the work with photo evidence of prep, primer application, backer rod installation, and finished bead profile
Contractors who quote a single price for “re-caulking” without joint-by-joint differentiation are not providing professional specification. The lowest bid often becomes the most expensive over the building’s life.
For BC strata councils, the signs your building needs sealant replacement guide covers when to initiate this process. The coordinating strata exterior restoration guide covers tender management and contractor selection.
Related guides
- Sealant and Caulking Hub — sealant types, lifespan, and BC-specific considerations
- Silicone vs Polyurethane Sealant — material comparison for joint types
- Signs Your Building Needs Sealant Replacement — when to initiate restoration
- Coordinating Strata Exterior Restoration — tender management for envelope projects
Frequently Asked Questions
More from Sealant & Caulking Guide
Field Sealant Adhesion Testing on BC Restoration Projects
A sealant that won't stick is a leak waiting to happen. Why a hand pull test on a Surrey restoration project catches the failure before it ever ships.
Read article →Expansion Joint Failure Between Precast Concrete Panels in Vancouver
The joints between precast panels on a Vancouver high-rise move constantly, and sealant is the only thing keeping rain out. Why they fail and how to fix them.
Read article →Window Perimeter Sealant Failure on Vancouver Curtain Wall Towers
The sealant around window and curtain wall joints is the first line of defence against wind-driven rain on a Vancouver tower — and the first thing to fail. How to spot it, why it happens, and what restoration actually involves.
Read article →