Rainscreen vs. face-sealed walls: why one failed on the BC coast and what it means for a retrofit
A face-sealed wall bets everything on keeping its outer surface watertight forever. A rainscreen assumes water will get past the cladding and gives it a way back out: a drained, vented cavity behind the cladding that lets the wall dry between rain events. In a region that takes more than 1,100 mm of rain a year, most of it wind-driven, that difference decided which buildings survived and which ones rotted. Trapped water in face-sealed walls is what drove the BC leaky-condo crisis of the late 1980s to mid 1990s, and it is why rainscreen construction has been required in the City of Vancouver since 1996.
Rainscreen is the right assembly for almost any exterior wall on the coast, and it is what the code now requires for exposed conditions. Face-sealed still has a narrow home in dry climates and in sheltered, low-exposure, or interior walls. If you own an older Metro Vancouver building, the practical question is not which is better in theory. It is which one you actually have, whether it is failing, and what a correct fix looks like before you commit a reserve fund to it.
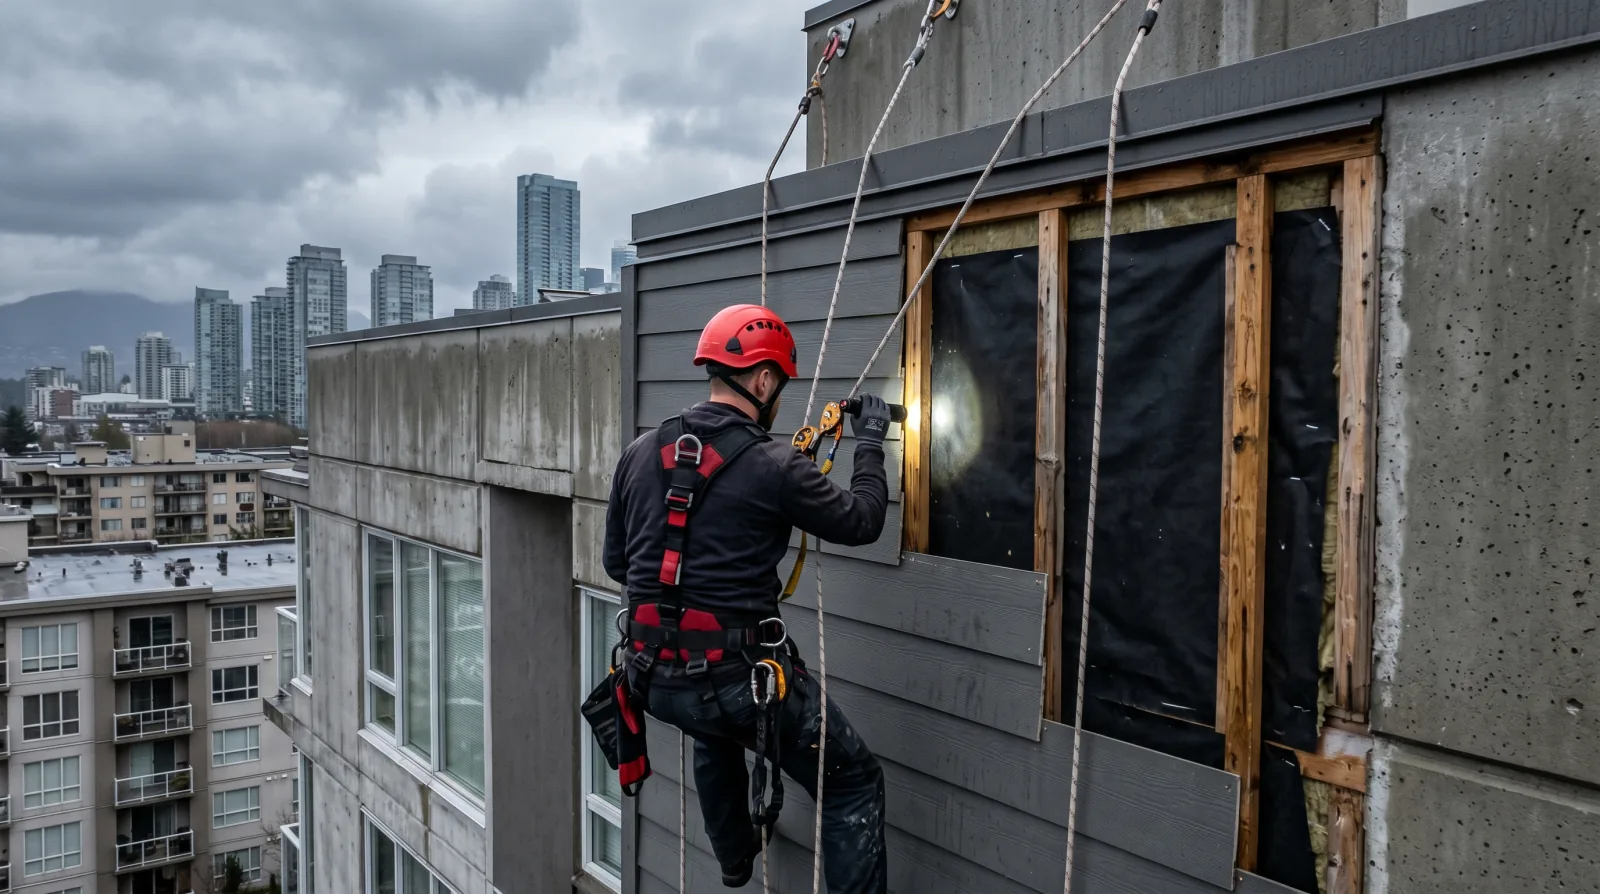
The bet a face-sealed wall makes, and why it lost
A face-sealed wall has one job at the outer plane: stop every drop of water before it gets in. There is no cavity behind the cladding and no backup path. Every caulked joint, every window interface, every penetration has to stay watertight for the life of the building. That is a very demanding bet in a climate like ours. Sealant is a maintenance item, not a permanent seal, and even a small opening at a window head lets wind-driven rain track inside.
Wind is the part people forget. On an open elevation, wind does not just carry rain against the wall, it drives that water into any gap under pressure. A crack or an open seam that would drip harmlessly in still air becomes a straw that pulls water into the wall when a storm pushes on the face. Buildings also move. Thermal cycling, wind load, and normal settlement all flex the structure, and that flexing opens the very joints a face-sealed wall depends on. So the seal that was perfect on the day it was installed is already loosening a few winters later.
Here is the part that made it dangerous. Once water got past the outer face of a face-sealed wall, it had nowhere to go. It sat against the wood sheathing and framing, which stayed wet through a Vancouver winter, and that is where rot and mould begin. The water often ran sideways and down inside the wall, so the damage showed up far from the leak and stayed hidden until the sheathing was soft or the drywall stained. Thousands of buildings across the region failed this way in the late 1980s to mid 1990s. That is the BC leaky-condo crisis, and it is the reason the code changed.
How a rainscreen manages incidental water
A rainscreen starts from a more honest assumption: some water will always get past the cladding, so the wall needs to handle it. It does this with three lines of defence working together. The first is deflection: the outer cladding sheds the bulk of the rain. The second is drainage: a drained air gap behind the cladding, the cavity, carries past-the-cladding water down and out. The third is drying: the same cavity is vented so air can move through it and carry moisture vapour away. Behind the cavity, against the sheathing, sits a water-resistant barrier that is the real last line holding water out of the structure.
When rain gets past the cladding, it meets the barrier, runs down the cavity, and exits at the flashing near the base of the wall. Nothing is trapped, because the gap is drained. The same gap is vented, so air moves through it and carries moisture vapour out, which lets the sheathing and framing dry between rain events. That drain-and-dry pairing is the whole point. A rainscreen does not promise a wall will never let water past the cladding. It promises the water that does get in can leave and the wall can dry out before anything rots.
There is a detail worth knowing, because contractors use both terms. A vented rainscreen has openings at the bottom of the cavity only, which lets water drain and lets a little air in. A fully ventilated rainscreen has openings at both the top and the bottom, which sets up airflow through the cavity and dries the back of the cladding and the sheathing faster. On the wet coast, more drying capacity is generally better, and the detailing of those openings, along with the base flashing, is what separates a real rainscreen from a wall with a useless gap behind it.
Two assemblies compared
Rainscreen wall assembly
A drained and vented cavity wall. Three lines of defence work together: a durable outer cladding, an air gap (cavity) behind it, and a water-resistant barrier against the sheathing. The gap lets any water that gets past the cladding drain out and lets the wall dry.
Face-sealed wall assembly
A wall that relies on a single watertight outer plane. Everything depends on keeping every joint, seam, and penetration perfectly sealed forever. There is no cavity behind the cladding and no second path for water.
Why the Metro Vancouver coast changes the answer
The same two assemblies behave very differently depending on where you build them. In a dry inland climate with light rain, a face-sealed wall can last a long time, because the outer seal rarely has to fight much water and the wall dries fast when it does get wet. Metro Vancouver is the opposite case. The region takes more than 1,100 mm of precipitation a year, a large share of it wind-driven rain that arrives in long wet stretches through fall and winter. The walls stay wet for weeks, the sun that would dry them out is scarce, and the wind keeps pushing water into every opening.
That climate is what turned a design weakness into a regional disaster. Through the late 1980s and early 1990s, a building boom produced thousands of wood-frame condominiums with face-sealed walls. They leaked, the trapped water rotted the framing, and the repair bills ran into the billions. The provincial response was the Barrett Commission, the Commission of Inquiry into the Quality of Condominium Construction, set up in April 1998 and chaired by former premier Dave Barrett. Its report, released in June 1998, carried 82 recommendations, and among them was the use of rainscreen systems along with better envelope detailing and trade training. A Canada Mortgage and Housing Corporation survey around the same period examined 46 coastal buildings, 37 of them with documented water problems, and confirmed the same pattern: face-sealed walls in a wet, windy climate do not dry, and water that cannot dry destroys the structure.
The lasting result is the rule you can still use today. The City of Vancouver required rainscreen wall construction from 1996, and the requirement extended across coastal BC by 2006, per BC Housing Builder Insight guidance. So the coast does not just prefer a rainscreen. Its climate is the reason the assembly exists, and its history is the reason the code demands it.
How each assembly fails, and the part owners never budget for
The two assemblies do not just perform differently, they fail differently, and the way they fail is what catches owners out. A rainscreen tends to fail locally and visibly. A cavity gets blocked by debris or a botched renovation, or a single flashing detail is missed at one window, and you get a contained wet spot near that fault. It shows up early, it stays in one place, and it is a targeted repair. The assembly is forgiving because the barrier and the cavity keep the rest of the wall protected while you fix the one bad detail.
A face-sealed wall fails in the worst possible way: silently, and everywhere at once. Water enters at a joint, then travels sideways and down through the wall, so the stain that finally appears in a unit can be metres from the leak and months or years after it started. By the time anyone sees a symptom, the sheathing behind the finish is often already soft and the framing may be rotted. That gap between when the damage starts and when it becomes visible is the part owners never budget for. A reserve study built on the outside looking sound can be badly wrong once the wall is opened. This is why an exploratory opening and moisture readings matter so much: they turn a hidden, unbudgeted problem into a measured, priceable one before it grows into structural repair.
What a correct rainscreen retrofit actually includes
Converting a face-sealed wall to a rainscreen is not just adding a gap. Done right, it rebuilds the water management of the whole wall. The cladding comes off. Strapping or a drainage layer goes on to create the cavity, sized and detailed so water can actually drain and air can actually move. A continuous water-resistant barrier goes over the sheathing, lapped correctly so it sheds water downward like shingles rather than trapping it. Every interface gets renewed: window heads, sills, and jambs, deck and balcony junctions, penetrations for vents and pipes, and transitions to the roof and foundation. Base flashing and weep paths at the bottom of the cavity give the drained water a clean exit. Only then does new cladding go back on.
The interfaces are where the job is won or lost. Face-sealed walls almost always leaked at windows and penetrations, so a retrofit that puts new cladding on but reuses tired window flashing has not fixed the actual leak path. A good specification treats each window as its own small waterproofing detail, integrated into the barrier and the flashing, not just caulked at the edge. The barrier must be continuous and correctly lapped, because a barrier with reversed laps or open seams simply funnels water to a new hidden spot. If your contractor cannot walk you through how the barrier laps and how each window ties into it, that is a warning sign about the whole retrofit.
Standards and what to verify
Envelope work in BC leans on a few real reference points, and it helps to know their names when you read a proposal. CSA S478, the Guideline on Durability in Buildings, is the framework Canadian practice uses to set durability targets for building assemblies, including walls. The rainscreen approach itself is documented in BC Housing Builder Insight guidance, which lays out the drained and vented cavity, the water-resistant barrier, and the interface detailing that make the assembly work. On top of these, the BC Building Code sets the legal requirements for the exposure conditions found on the coast.
What you should verify is less about memorizing a standard number and more about confirming the design follows recognized practice. Ask whether an envelope engineer has specified the assembly and interface details, whether the barrier and flashing details are drawn and not just described, and whether the drained cavity has a real path to daylight at the base. On an occupied strata, also confirm the work is being coordinated as a designed system rather than trade by trade, because the leaks in these walls happen at the boundaries between trades, at the window installer's edge or the roofer's transition, not in the middle of anyone's scope. For a larger, engineer-coordinated program that goes beyond the walls, our building restoration team handles multi-system envelope rehabilitation.
What drives the cost, without inventing a number
A rainscreen retrofit does not have a menu price, and any contractor who gives you a firm number before opening the wall is guessing. What moves the cost is the scope the wall actually needs. Total wall area sets the baseline. Then the big variables stack on top: how much cladding and flashing must be replaced, whether the windows are being renewed at the same time (which is often the right call while the wall is open), the access method the building height and site allow, and, above all, how much hidden rot appears once the cladding comes off.
Access alone can swing the budget. A low-rise wall reachable from a scaffold costs differently than a high-rise face worked from swing stage or rope access, and site constraints (setbacks, lanes, overhead lines) change what is even possible. Hidden damage is the true wild card. A wall that looks sound from the street can carry rot that only shows once it is open, which is why a fair contract includes a written process for pricing and approving that damage as a change as it appears, rather than a surprise bill at the end. Compare the assembly cost against the alternative of doing nothing: a face-sealed wall that keeps leaking does not hold its cost steady, it grows the repair every winter it is left. Our comparison of envelope repair versus recladding walks through how to size that spend.
Lifecycle: why the cheaper wall costs more over time
Face-sealed looks cheaper on day one and cheaper to patch, which is exactly why it spread through the boom years. The real cost arrives later and it arrives large. Every recaulking cycle is money spent on a seal that will open again. Every hidden leak that runs for a year or two adds interior repair, insulation replacement, and eventually framing repair to the eventual bill. When the wall finally has to be converted, you pay for the rainscreen retrofit anyway, plus all the damage the trapped water caused in the meantime, plus the years of maintenance caulking that only delayed the reckoning.
A rainscreen costs more to build or to convert to, but it changes the shape of the spending. Once the assembly can drain and dry on its own, the wall stops generating hidden damage, maintenance drops to keeping vents clear and joints sound, and the service life stretches out for as long as the cladding and barrier last. Over a twenty to thirty year window, the rainscreen almost always wins on total cost, and it wins by a wide margin once you count the interior damage and resident disruption that a chronically leaking face-sealed wall keeps producing. The reason a strata sometimes still delays is cash flow, not logic: the upfront number is larger, even though the lifetime number is smaller.
Warranty reality: what the paper does and does not promise
On a proper rainscreen retrofit you typically end up with several warranties: one on the water-resistant barrier or membrane from its manufacturer, one on the cladding product, and one on the contractor's workmanship. The two that protect you against leaks are the barrier warranty and the workmanship warranty, because most retrofit leaks trace back to a detail at an interface, which is a workmanship matter, not a product defect. Read what the workmanship warranty covers and for how long, because a warranty measured in a few months on a wall meant to last decades is not real protection.
Face-sealed warranties are weaker in a way that is easy to miss. A sealant warranty or a coating warranty covers the product performing as specified, not the wall staying dry. Because a face-sealed assembly has no second line of defence, no warranty on any single component can promise the wall will not leak, since the design itself allows one failed joint to become a wall problem. That is the quiet lesson of the whole comparison: a rainscreen lets a warranty mean something, because the assembly is forgiving enough that a covered repair fixes a contained fault. A face-sealed wall asks a warranty to guarantee perfection, and nothing can.
Where each is the wrong tool
It is worth being fair to face-sealed, because the goal is the right wall, not dogma. A face-sealed or simply-coated wall is a defensible choice in genuinely low-exposure spots: a deeply sheltered courtyard elevation under overhangs and canopies, an interior partition, or a wall in a dry climate that rarely sees wind-driven rain. In those places the drying demand is low and the added cost of a drained cavity buys little. Spending reserve money to convert a wall that never gets wet is its own kind of waste.
A rainscreen is the wrong tool only in those same narrow, sheltered conditions, and even then it does no harm beyond cost. The far more common and expensive mistake runs the other way: leaving a face-sealed wall in place on an exposed coastal elevation because it looks fine, then paying for the rot later. On the Metro Vancouver coast, most exterior walls are exposed, so most of the time the honest answer favours the rainscreen. The skill is in telling the true exceptions apart from wishful thinking, and that is what moisture readings and an exploratory opening are for.
How to read a contractor's proposal for this work
A trustworthy proposal for wall work starts with investigation, not a price. It should say the assembly will be confirmed by exploratory openings before the scope is fixed, name where those openings go, and price the investigation separately from the retrofit. When the retrofit scope arrives, it should describe the assembly being built, not just the finish: the cavity, the barrier and how it laps, the flashing at windows and penetrations, and where the cavity drains at the base. If the proposal only mentions new cladding and caulking, it is a re-clad dressed up as a repair, and it will likely repeat the original failure.
Watch for a few specific things. A firm all-in price with no exploratory step is a red flag on any older wall, because the writer cannot know the hidden condition. No allowance or change process for rotted sheathing means you carry all the surprise risk. New cladding going straight back over a face-sealed wall with no cavity added means the assembly is not actually being fixed. And on a strata-scale job, the absence of an independent envelope engineer, so the same party designs and builds with no second set of eyes, is worth questioning. The strongest proposals make the uncertainty visible and tell you how it will be handled, rather than hiding it behind a confident number.
Four Metro Vancouver scenarios, and the honest call
1980s concrete high-rise, West End, hairline cracking and one wet elevation
Situation: A concrete tower from the mid 1980s with a painted concrete facade. Hairline cracks are showing across the west face, one corner unit reports damp at the ceiling after storms, and the strata has been re-caulking window perimeters every few years.
Call: Confirm the assembly, then likely a targeted rainscreen or drained retrofit on the wet elevation, not a full re-clad of every face.
Why: A concrete wall behaves differently from wood-frame. The concrete itself will not rot, but water tracking through cracks and failed window seals still damages interiors and insulation and keeps the wall wet. Because concrete towers are often built face-sealed with a painted or coated concrete face, the honest first step is an exploratory look at the wet corner and the window interfaces. If only the west elevation is failing, converting that face to a drained assembly and renewing the window interfaces there costs far less than treating all four faces the same. The recurring caulking is the tell: the assembly is fighting water at the surface and losing.
Wood-frame 4-storey strata, North Shore, north-facing decks and walls
Situation: A late 1980s wood-frame strata in North Vancouver. North-facing walls stay damp and mossy, a few units report musty smells, and the original walls appear to be stucco over sheathing with no cavity. Build date is before the rainscreen requirement.
Call: Plan a rainscreen conversion, and treat this as urgent rather than a watch-and-wait item.
Why: This is the highest-risk case on the page. Wood-frame plus a pre-1996 build date plus a north elevation that never gets sun to dry it out is the exact recipe that drove the leaky-condo crisis. In a face-sealed wood wall, trapped water rots the sheathing and framing quietly, and the repair grows every year you wait. An exploratory opening will almost certainly find high moisture and probably some soft sheathing. The right call is a drained, vented rainscreen conversion, coordinated with an envelope engineer and written into the depreciation report, before the structural repair scope balloons.
Downtown mixed-use building, sheltered courtyard elevation
Situation: A newer mixed-use building with retail at grade. Most faces are exposed, but one interior courtyard elevation sits under deep overhangs and a canopy, gets almost no direct rain, and shows no signs of water trouble. Budget is tight and the owner wants to know where to spend.
Call: Prioritize the exposed elevations for rainscreen work and leave the sheltered courtyard face as a maintain-and-monitor item. Here the simpler answer wins.
Why: Not every wall needs the same treatment, and pretending it does wastes the reserve fund. The courtyard elevation takes little wind-driven rain, so a well-maintained face-sealed or lightly coated wall there can be a reasonable holding position while the money goes to the faces that actually get hammered by coastal storms. This is the case where the honest recommendation is do less on this wall. The caution: confirm with moisture readings that the sheltered face really is dry, because a hidden roof or canopy leak can fool the eye.
Small stucco low-rise, Burnaby, isolated leak at one window
Situation: A three-storey stucco walk-up. One third-floor unit gets a stain below a window after heavy rain. The rest of the building looks fine, moisture readings elsewhere are normal, and the stucco is otherwise sound.
Call: Repair the window interface and local detail first. A building-wide rainscreen conversion is not justified yet.
Why: A single leak at one window is a detail problem, not proof the whole assembly has failed. Opening up around that window will usually show a failed head flashing or a gap at the sill, which is a targeted fix. Jumping straight to a full re-clad because one window leaks is the opposite mistake from ignoring a wet elevation. Fix the detail, take moisture readings to confirm the damage is local, and set a monitoring schedule. If the same pattern shows up at more windows over the next season, then the conversation shifts to the assembly.
Decision framework: questions for an older building
| Question | Recommendation | Reason |
|---|---|---|
| Building predates 1996 (Vancouver) or 2006 (coastal BC)? | Assume face-sealed | Rainscreen only became required in the City of Vancouver in 1996 and across coastal BC by 2006. Walls built before those dates were often face-sealed and are the ones now reaching the end of their watertight life. |
| Staining, damp, or soft interior finishes at wall corners? | Investigate now | Interior symptoms usually mean water is already trapped in the wall. In a face-sealed assembly it has been moving unseen for a while. An exploratory opening tells you how far it has spread before you scope the repair. |
| Sealant joints failing and being re-caulked repeatedly? | Plan a rainscreen retrofit | Recaulking a face-sealed wall treats the symptom. If the joints keep opening and water keeps getting in, the assembly itself is the problem, and the fix is a drained, vented cavity behind the cladding. |
| Full re-clad already in the depreciation report? | Upgrade to rainscreen while open | If the cladding is coming off anyway, adding the strapping, barrier, and flashings to make it a rainscreen is a fraction of the added scope and corrects the assembly permanently. Re-cladding face-sealed over face-sealed repeats the original mistake. |
| Wall is a low-exposure, sheltered, or interior surface? | Rainscreen may be optional | The drying benefit matters most where wind-driven rain is heavy. A protected wall under deep overhangs with little direct rain load carries less risk, though on the BC coast very few exterior walls are truly sheltered. |
| One wet elevation, the rest sound? | Phase by elevation | Wind-driven rain does not hit every face equally. The south and west elevations usually take the worst of it. You can convert the failing elevation first and stage the rest across funding cycles, as long as an engineer confirms the sound faces can wait. |
| Moisture readings high but no visible damage yet? | Act before the next winter | Elevated moisture in the sheathing with no stain yet is the best case you will ever get: you found it before the rot. Converting the assembly now is far cheaper than after the framing softens and the scope grows into structural repair. |
| Considering only a fresh coat or new cladding face? | Confirm the assembly first | A coating or a new cladding face on top of a trapped-water wall hides the problem instead of fixing it. Decide what the wall assembly is before you spend money on the surface, or you pay twice. |
| Unsure whether the wall drains or is sealed? | Confirm before budgeting | You cannot scope a retrofit accurately without knowing the assembly. A targeted opening at a representative elevation confirms whether there is a cavity, what the barrier is doing, and how wet the sheathing is. |
Questions to ask before you approve the scope
Put these to any contractor bidding wall work on an older building. The answers tell you fast whether you are dealing with a firm that understands the assembly or one that will re-clad over the same failure. The red-flag answer is noted for each.
Have you confirmed whether the wall is a rainscreen or face-sealed, and how?
Red flag: A firm quote for a full retrofit before anyone has opened the wall. If they cannot say whether there is a cavity, they are guessing at your scope.
Where will the exploratory openings be, and how many?
Red flag: One opening on the most sheltered face, or none at all. Exposure varies by elevation, so the openings should sample the faces most likely to be wet.
Is an envelope engineer involved, and who issues the specification?
Red flag: The contractor both designs and builds with no independent engineer on a strata-scale retrofit. On larger work, the design and the build should be separate sets of eyes.
How will the water-resistant barrier and flashings be detailed at windows and penetrations?
Red flag: A vague answer, or new cladding going on without renewed flashing at the window heads and sills. The interfaces are where face-sealed walls leaked, so they are where a retrofit is won or lost.
How is the cavity drained and vented, and where does water exit?
Red flag: No clear base flashing or weep path in the plan. A cavity with nowhere to drain is not a rainscreen, it is just a gap.
What happens if you open the wall and find rotten sheathing or framing?
Red flag: No allowance and no change-order process for hidden damage. On an older face-sealed wall you should expect some, and the contract should say how it gets priced and approved.
Are you converting the assembly, or re-cladding over the existing one?
Red flag: A plan to put new cladding straight back over a face-sealed wall with no cavity added. That resets the clock on the same failure.
What warranties come with the barrier, the cladding, and the workmanship?
Red flag: A single vague warranty, or workmanship coverage measured in months. The labour and barrier warranties are the ones that protect you if a detail leaks.
How will you protect occupied units and manage access during the work?
Red flag: No plan for weather protection, dust, or resident notice on an occupied strata. Envelope work runs for weeks and touches every unit on a face.
Can you phase the work by elevation, and in what order?
Red flag: A take-it-all-or-nothing bid with no option to start on the worst face. Phasing by exposure is often the sensible way to fund a large retrofit.
When you have narrowed the decision to how much work the wall needs, a few sibling comparisons help size it: envelope repair versus recladding for the scope question, specialist restoration contractor versus general painter for who should do the work, and the full building envelope resource hub for the rest of the decisions that go with a coastal retrofit. If the wall assessment points to a drained retrofit, our waterproofing and building envelope repair teams scope and stage the work elevation by elevation.
Quick answers
What is the difference between a rainscreen wall and a face-sealed wall?
A face-sealed wall tries to stop all water at a single outer surface, so everything depends on keeping every joint and seam sealed. When water gets past that surface, it is trapped in the wall with no way to drain or dry. A rainscreen wall assumes water will get past the cladding and plans for it: a durable outer cladding does most of the work, an air gap (cavity) behind it lets any water that gets through drain back out, and a water-resistant barrier protects the sheathing. The cavity also lets the wall dry between rain events. That drain-and-dry capability is the core difference, and it is why rainscreen construction holds up on the wet BC coast where face-sealed walls failed.
Why did face-sealed walls fail during the BC leaky-condo crisis?
Face-sealed walls depend on a perfect, permanent outer seal, and no sealed joint stays perfect forever in Metro Vancouver weather. Once water got past a caulked joint or a window interface, it had nowhere to go. It sat against the wood sheathing and framing, which stayed wet through the winter, and that is how rot and mould take hold. Because the water tracked sideways and down inside the wall, the damage was often far from where the water entered and stayed hidden until the sheathing was soft or the interior finish stained. That combination of trapped water and no drying path drove the leaky-condo crisis of the late 1980s to mid 1990s. The response was to require rainscreen construction, which the City of Vancouver adopted in 1996 and coastal BC adopted by 2006, according to BC Housing Builder Insight guidance.
How does a rainscreen manage the water that gets past the cladding?
It gives that water a controlled path back out. Rain that gets past the outer cladding hits the water-resistant barrier on the sheathing, then runs down the air gap behind the cladding and exits at the flashing near the base of the wall. Nothing is trapped, because the cavity is drained. The same gap is vented, so air can move through it and carry moisture vapour out, which lets the sheathing and framing dry between rain events. Metro Vancouver takes more than 1,100 mm of precipitation a year, most of it wind-driven rain, so some water always reaches the barrier. The rainscreen is built around that reality instead of pretending the outer face will never leak.
Rainscreen and wall assembly questions
What is the difference between a rainscreen wall and a face-sealed wall?
A face-sealed wall tries to stop all water at a single outer surface, so everything depends on keeping every joint and seam sealed. When water gets past that surface, it is trapped in the wall with no way to drain or dry. A rainscreen wall assumes water will get past the cladding and plans for it: a durable outer cladding does most of the work, an air gap (cavity) behind it lets any water that gets through drain back out, and a water-resistant barrier protects the sheathing. The cavity also lets the wall dry between rain events. That drain-and-dry capability is the core difference, and it is why rainscreen construction holds up on the wet BC coast where face-sealed walls failed.
Why did face-sealed walls fail during the BC leaky-condo crisis?
Face-sealed walls depend on a perfect, permanent outer seal, and no sealed joint stays perfect forever in Metro Vancouver weather. Once water got past a caulked joint or a window interface, it had nowhere to go. It sat against the wood sheathing and framing, which stayed wet through the winter, and that is how rot and mould take hold. Because the water tracked sideways and down inside the wall, the damage was often far from where the water entered and stayed hidden until the sheathing was soft or the interior finish stained. That combination of trapped water and no drying path drove the leaky-condo crisis of the late 1980s to mid 1990s. The response was to require rainscreen construction, which the City of Vancouver adopted in 1996 and coastal BC adopted by 2006, according to BC Housing Builder Insight guidance.
How does a rainscreen manage the water that gets past the cladding?
It gives that water a controlled path back out. Rain that gets past the outer cladding hits the water-resistant barrier on the sheathing, then runs down the air gap behind the cladding and exits at the flashing near the base of the wall. Nothing is trapped, because the cavity is drained. The same gap is vented, so air can move through it and carry moisture vapour out, which lets the sheathing and framing dry between rain events. Metro Vancouver takes more than 1,100 mm of precipitation a year, most of it wind-driven rain, so some water always reaches the barrier. The rainscreen is built around that reality instead of pretending the outer face will never leak.
Does my older Vancouver building have a rainscreen or a face-sealed wall?
The build date is the first clue. Rainscreen construction only became required in the City of Vancouver in 1996 and across coastal BC by 2006, so many buildings from the late 1980s and early 1990s were built face-sealed. But the date alone is not proof, and some walls were rebuilt during a past repair. The only way to know for certain is to open a small, representative section of the wall and look for a cavity behind the cladding, check what the water-resistant barrier is doing, and take a moisture reading on the sheathing. We do this as a targeted exploratory opening before scoping any retrofit, because the assembly type changes the whole repair plan.
Can you convert a face-sealed wall to a rainscreen without full demolition?
You do not demolish the structure, but you do have to open up the exterior. Converting a face-sealed wall to a drained, vented rainscreen means removing the existing cladding, adding strapping or a drainage layer to create the air gap, renewing the water-resistant barrier and flashings, and installing new cladding. The framing and sheathing usually stay unless they are rotted. It is more scope than simply re-caulking or re-cladding, but it fixes the reason the wall was failing rather than resetting the clock on the same trapped-water problem. On a strata building, this is the kind of work that belongs in the depreciation report and gets coordinated with an envelope engineer. Our building envelope repair team scopes these conversions elevation by elevation.
Is re-caulking enough to fix a leaky face-sealed wall?
Re-caulking can slow water entry for a while, but it does not fix a failing face-sealed assembly. The problem with a face-sealed wall is not only that a joint opened, it is that when water does get in there is no cavity to drain it and no gap to dry it. New sealant will eventually open again, and in the meantime any water that gets past it is trapped just like before. On a sheltered, low-exposure wall, maintenance caulking may be a reasonable holding measure. On a wall taking sustained wind-driven rain, repeated recaulking is money spent on the symptom. The durable fix is to convert the wall to a rainscreen so the assembly can drain and dry on its own. Our rainscreen systems guide covers what that assembly involves, and the comparison of envelope repair versus recladding shows how to size that decision.
When did rainscreen construction become required in BC?
The City of Vancouver required rainscreen wall construction starting in 1996, and the requirement extended across coastal BC by 2006, according to BC Housing Builder Insight guidance. Those dates came directly out of the leaky-condo crisis, when thousands of face-sealed buildings failed and it became clear the wet coastal climate needed a wall that could drain and dry. For a building owner, the dates are a useful screening tool: a building whose original walls predate the rainscreen requirement in its municipality is more likely to be face-sealed and worth investigating before the next major maintenance cycle.
What was the Barrett Commission and why does it still matter?
The Barrett Commission was the Commission of Inquiry into the Quality of Condominium Construction in British Columbia. It was set up in April 1998, chaired by former premier Dave Barrett, and its report came out in June 1998 with 82 recommendations. The inquiry looked at the wave of water-damaged condominiums built through the late 1980s and early 1990s, and its recommendations included the use of rainscreen systems, better envelope detailing, envelope quality management, and training of trades. It matters today because it is the paper trail behind why BC walls are built the way they are now. When an engineer tells you a pre-1996 face-sealed wall needs converting, the Barrett Commission and the leaky-condo era are the reason that advice exists.
How much does it cost to convert a face-sealed wall to a rainscreen?
There is no honest flat figure, because the cost is set by what the wall actually needs, and you only learn that after you open it. The main drivers are the total wall area, how much cladding and flashing has to be replaced, whether the windows are being renewed at the same time, how much rotted sheathing or framing turns up once the wall is open, and the access method (rope access, swing stage, or scaffold) that the building height and site allow. Hidden damage is the wild card: a wall that looks fine from outside can carry rot that only shows up during the work, which is why a good contract includes a process for pricing and approving that as it appears. The reliable way to budget is a targeted exploratory opening first, then a scope priced against what it finds, rather than a number pulled before anyone has looked inside.
Are rainscreen walls required by the BC Building Code today?
Yes, for the exposure conditions that matter on the coast. Following the leaky-condo crisis, drained rainscreen wall construction became the required approach for walls facing significant wind-driven rain in coastal BC, and the code and supporting guidance reflect that. New construction in Metro Vancouver is built this way as a matter of course. For an existing older building, the code does not force you to convert a working wall, but once you are doing major envelope work, an engineer will specify a drained rainscreen assembly because that is the durable, code-aligned way to rebuild a coastal wall. Confirm the specific requirements for your project with your envelope engineer and local building department, since exposure and building type change what applies.
Can I just put a coating over a face-sealed wall to keep water out?
A coating can shed some surface rain and improve appearance, but it cannot fix a face-sealed assembly, and on a wall with trapped moisture it can make things worse. If the wall already holds water, sealing the outer face more tightly can slow the little drying it does get, keeping the sheathing wet longer. A coating also does nothing for water entering at window interfaces and penetrations, which is where face-sealed walls usually leak. Coatings have a real role on sound walls and on concrete facades where cracking is the main issue, but they are a surface treatment, not an assembly repair. Decide what the wall assembly is before spending on the surface. Our exterior coatings team will tell you honestly when a coating is the right tool and when the wall needs a drained retrofit instead.
How do I know if my leak is a detail problem or a whole-assembly failure?
The pattern tells you. A single stain under one window after heavy rain usually points to a failed detail, such as a head flashing or a sill gap, and that is a targeted repair. When you see damp at multiple corners, repeated leaks across an elevation, recurring failed caulking, and rising moisture readings in the sheathing, that pattern points to the assembly itself failing rather than one detail. The way to tell them apart is to open the wall at the leak and take moisture readings at several points across the elevation. If the wetness is local and the rest reads dry, fix the detail. If moisture is elevated across the face, you are looking at a rainscreen conversation. Guessing between the two is how owners either overspend on a full re-clad or underspend and let rot grow.
Find out whether your walls drain or trap water
We assess wall assemblies across Vancouver, North Vancouver, West Vancouver, and Burnaby, checking build era, cladding condition, and moisture in the sheathing through a targeted exploratory opening, so you know whether you have a rainscreen or a face-sealed wall before you budget a repair.