Expansion Joint Failure Between Precast Concrete Panels in Vancouver
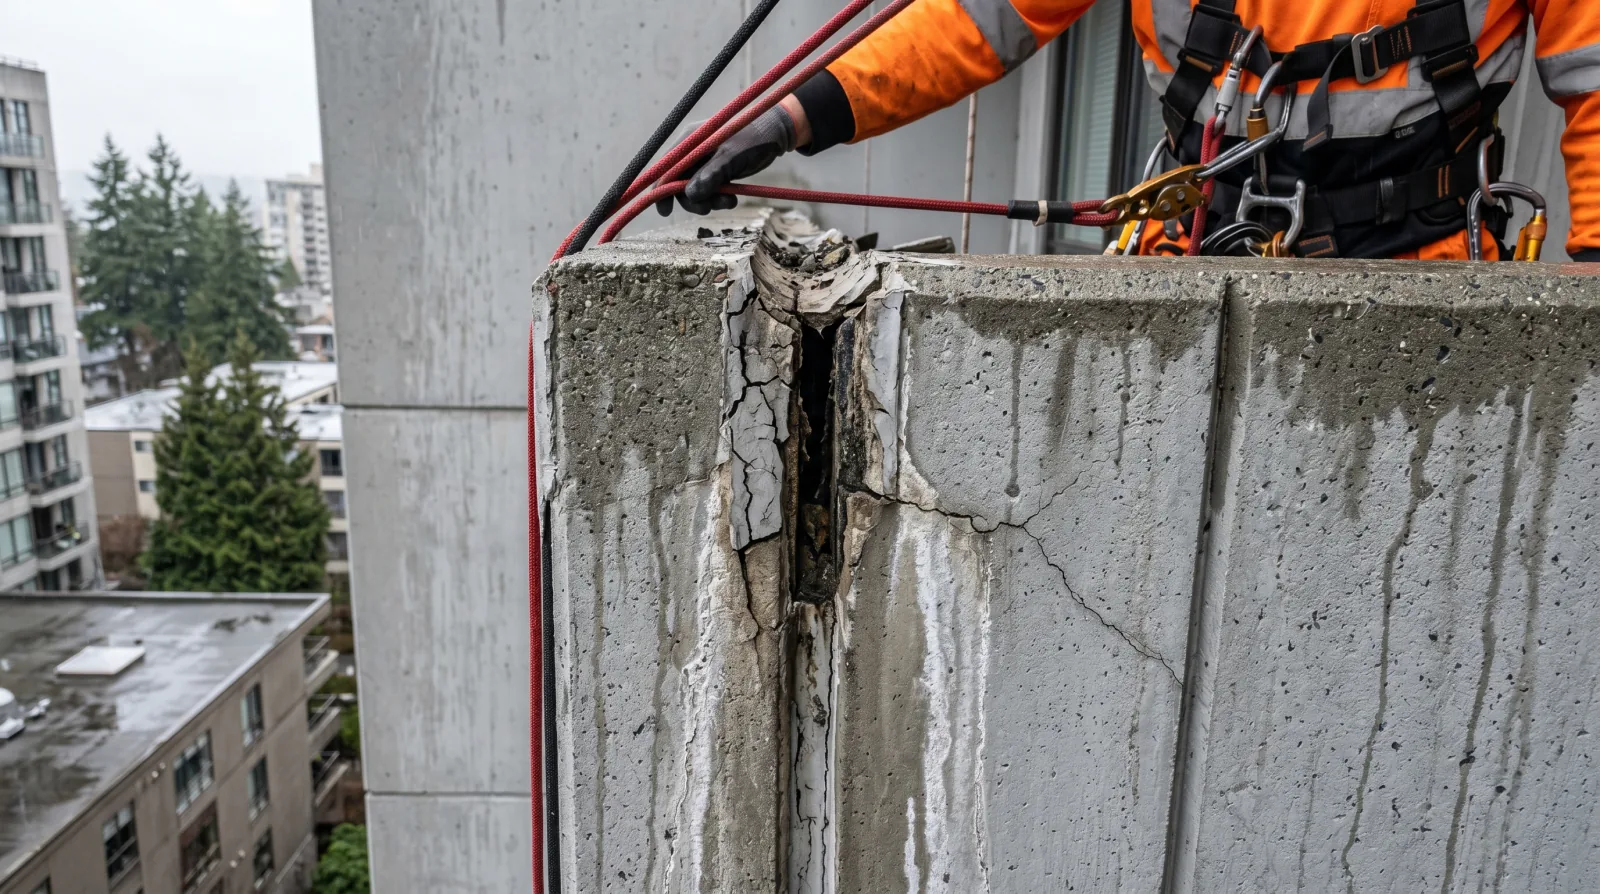
The gap between two precast concrete panels on a Vancouver high-rise looks like a flaw to most people who notice it. It isn’t. That gap is deliberate, and the building depends on it being there. What the building can’t survive is the failure of the thin bead of sealant filling that gap — because on a precast-clad tower, those joints are the primary weather barrier across the entire facade.
Precast concrete panels move. They expand and contract with temperature swings, and the building structure itself flexes under wind load. If the panels were butted tight against each other, that movement would crush their edges. So the design leaves a deliberate gap — a movement joint — to give the panels room to breathe. The job of keeping water out of that moving gap falls to a flexible sealant installed over a backer rod. And that detail, simple as it sounds, is where most precast-facade leaks begin.
Why these joints carry so much load
A movement joint between precast panels has one of the harder jobs on the building. It has to do two contradictory things at once: stay completely watertight, and stretch and compress as the panels move beneath it. Every day, as the sun warms the panels and the night cools them, as the wind pushes the building, the joint opens and closes by small amounts. The sealant in it is flexing constantly.
That continuous flexing, combined with UV exposure and the relentless wind-driven rain a Vancouver facade takes through the wet season, is what wears the sealant out. Over years the material hardens and loses its elasticity. At some point it can no longer stretch to accommodate the movement, and it fails — and it fails in specific, recognizable ways. This is the same wear process behind most of the signs that a building needs sealant replacement, concentrated at the joints that move the most.
How a panel joint fails
When you get close to a failing precast joint — and on a high-rise that means rope access or a swing stage, because you cannot judge a joint from the ground — you see one of a few failure modes:
- Cohesive splitting — the sealant tears down its own middle as it can no longer stretch across the joint movement. The bead is still attached to both panels, but it has split apart in the centre.
- Adhesive failure — the sealant pulls cleanly away from one or both panel edges, leaving an open gap along the bond line.
- Hardening and cracking — the surface develops a network of cracks as the material stiffens and loses flexibility.
From a distance, the indirect signs are staining or efflorescence below the joints — that white salt bloom marking where water has tracked through — and, inside the building, damp or staining on walls near the panel lines. Any of these means the joint is open and water is getting in.
The backer rod: the detail that decides everything
Here is the part of the joint that almost nobody outside the trade knows about, and the part that most often determines whether the repair lasts: the backer rod.
The backer rod is a foam rod pushed into the joint behind the sealant. It looks like packing material, and people dismiss it as filler. It is not filler. It does two specific, important jobs.
First, it sets the depth of the sealant so the bead forms the correct shape — roughly an hourglass profile, thinner in the middle than at the bonded edges, which is the shape that can stretch and compress without tearing. Too deep a bead, or too shallow, fails early.
Second, and this is the part that matters most, the backer rod prevents the sealant from bonding to the back of the joint. The sealant must bond only to the two panel faces, so it can flex freely between them as they move. If sealant bonds to all three surfaces — both panels and the back of the joint — you get what the trade calls three-sided adhesion, and it is a leading cause of premature joint failure. A bead bonded on three sides cannot stretch when the joint opens; it is anchored at the back while being pulled from the sides, so it tears. The backer rod exists specifically to break that back bond and let the sealant do its job. Skip it or install it wrong, and even a brand-new joint fails in a couple of seasons.
Why a cap-bead over old sealant doesn’t work
The tempting shortcut on a budget is to run a thin new bead of sealant over the old, failed sealant without removing it. On a movement joint, this almost never works. The same movement that broke the original sealant breaks the thin new cap-bead just as fast, and the new sealant often won’t bond properly to the degraded old material underneath. You spend money and the leak returns within a year or two. The trade-offs between a proper removal and a cap-bead are laid out in the caulking removal versus cap-bead comparison — and for a high-movement panel joint, full removal is almost always the right answer.
Choosing the sealant
High-movement joints between precast panels need a sealant rated for substantial movement. The two common choices are silicone and polyurethane. Silicone offers excellent UV stability and high movement capability. Polyurethane bonds well to concrete and resists abrasion. The right pick depends on how much the joint actually moves, the exposure of that elevation, and compatibility with any coating on the panels. The detailed trade-off is in the comparison of silicone versus polyurethane sealant for expansion joints in BC. The non-negotiable rule is that the sealant’s movement rating has to match what the joint does. A low-movement sealant in a high-movement joint will fail early, almost without exception.
What’s at stake if you leave it
A failed panel joint is a direct, open path for wind-driven rain into the wall. Water entering there can reach insulation, framing, and the reinforcing steel in the concrete. Persistent water in the structure is how you get rebar corrosion and spalling, and inside the building it means stained finishes, damaged drywall, and potential mould. The failed joint is one of the more common causes of water ingress in high-rise buildings, and left alone it turns a sealant maintenance item into a structural and interior repair problem — far more expensive than the joint restoration would have been.
How restoration actually goes
Proper restoration of a precast panel joint follows the same disciplined sequence every time, performed at height by IRATA or SPRAT certified rope access technicians working under WorkSafeBC fall protection rules. They descend the facade on dual rope lines and work joint by joint down each elevation:
- Cut out the failed sealant completely, back to clean panel faces on both sides.
- Clean and prime the joint faces per the sealant manufacturer’s specification — adhesion to concrete depends entirely on this prep.
- Install new backer rod to set the correct joint depth and break the back bond.
- Apply and tool fresh sealant into the proper hourglass profile, fully wetting both panel faces.
Rope access reaches every joint on the facade without a street-level platform or the cost and permitting of a swing stage or scaffold, which makes it efficient for the “touch every joint” nature of a facade-wide sealant program.
The joints between your precast panels are a wear item, the same as the tires on a vehicle. They have a finite service life, they are doing the hardest sealant job on the building, and they are the only thing keeping rain out of the wall across the whole facade. Inspect them up close on a planned cycle, renew them before they fail, and they stay a maintenance line item instead of becoming the leak that empties the contingency fund.
Related guides
- Sealant and Caulking Hub — sealant types, joint design, and restoration
- Silicone vs Polyurethane Sealant for Expansion Joints in BC — choosing the right movement-joint sealant
- What Causes Water Ingress in High-Rise Buildings — where failed joints lead
- Signs Your Building Needs Sealant Replacement — when to act on aging joints
Frequently Asked Questions
More from Sealant & Caulking Guide
Field Sealant Adhesion Testing on BC Restoration Projects
A sealant that won't stick is a leak waiting to happen. Why a hand pull test on a Surrey restoration project catches the failure before it ever ships.
Read article →Window Perimeter Sealant Failure on Vancouver Curtain Wall Towers
The sealant around window and curtain wall joints is the first line of defence against wind-driven rain on a Vancouver tower — and the first thing to fail. How to spot it, why it happens, and what restoration actually involves.
Read article →Sealant Removal vs Cap-Bead Repair: When to Use Each on BC Buildings
Cap-bead sealant repair is faster and cheaper than full removal and replacement — but it's also the most common reason re-caulking work fails within two years. When each approach makes sense, what the actual labour difference is, and how to specify the right approach in your tender.
Read article →